Aircraft Admin
Main Page / Accounts / Aircraft Admin
Creating An Aircraft
- Select Accounts tab. Select Admim/Aircraft Admin.
- Enter the details of the new aircraft by Selecting +Add.
- Enter the Registration of the aircraft. This is a mandatory field
- Tick the Is Resident tick box if the aircraft is a resident of the airport.
- Select Aircraft Code from the dropdown menu.
- Select Wing Type Code from the dropdown menu.
- Select Engine Count from the dropdown menu.
- Enter the Actual Weight, as a whole number, with no decimal places.
- The Weight Band should be automatically select from the dropdown menu, select from the dropdown menu if this doesn’t happen.
- The Footprint can be filled out to help manage hanger space
- Select a Default Parking Location if required, or leave as none.
- Select a Default Flight Rule Code if known, or leave as none.
- Select a Default Flight Type Code if known, or leave as none.
- Select a Default Operator Code if known, or leave as none.
- Enter the Customer Account Number associated with the aircraft for the Invoice Account. This is a mandatory field.
- Enter the Customer Account Number associated with the aircraft for the Fuel Account. This can be the same as the Invoice Account.
- If you want to add any notes about the aircraft then please use the Notes section
It is important to fill out the Effective Date so you only effect the appropriate range of dates.
Select Save to complete the aircraft creation.
Completing Aircraft Set-Up

- You can view the details of the aircraft that you just made or any other by clicking the Open button to the right of the aircraft's Registration.
- When in the Aircraft Details there are 6 tabs, Aircraft Details and Customer details are completed as part of Creating an Aircraft.
The Price Rules Tab
- The Price Rules tab allows you to optionally customise pricing based on products and groups specifically for that aircraft.
- Select + Add to open the Add Price Rule.
Selecting the drop-down menu, you can choose the Product Type (e.g. Fuel, ATC charges) and the Charge Group (e.g. Visitors, Residents).
Select Save to return to the Price Rules tab.
- Multiple entries can be made, but only one entry per Product Type.
The Logbook Tab
- The logbook is a history of the aircraft's movements and charges.
- The Search function can be used to dynamically search on any product number or unit price.
- Selecting the ˅ on the left of the row to expand the line to display additional details.
The Recurring Charges Tab
- The Recurring Charges tab provides details of all charges attached to that aircraft, along with frequency and dates of the charging.
- The Search function can be used to dynamically search within the information displayed in the table columns.
- Select the + Add to open the Add Recurring Charge screen.
- Customer and Aircraft will be automatically completed but can be changed by entering a new Customer Number.
- Product is selected from a dropdown of recurring Products available.
- Net Value is automatically completed.
- Tax Code is selected from the dropdown options of (Default), Standard, Reduced or Zero
- Ticking the Is Active box will mean that transactions are made in line with the details provided. Unticking will put the recurring charge on hold.

- Frequency gives options from Daily to Annually, it is a required field.
- Not Before is optional but works as a from date, charges will begin immediately and is left blank.
- Not After is optional but works as a to date, charges will be made indefinitely if left blank.
- Next Charge can be left blank and will begin charges based on the Not Before date or immediately if both are blank.
- Select Save to complete the recurring charge.
The Prepaid tab
- The Prepaid tab enables you to set up prepaid items that are available.

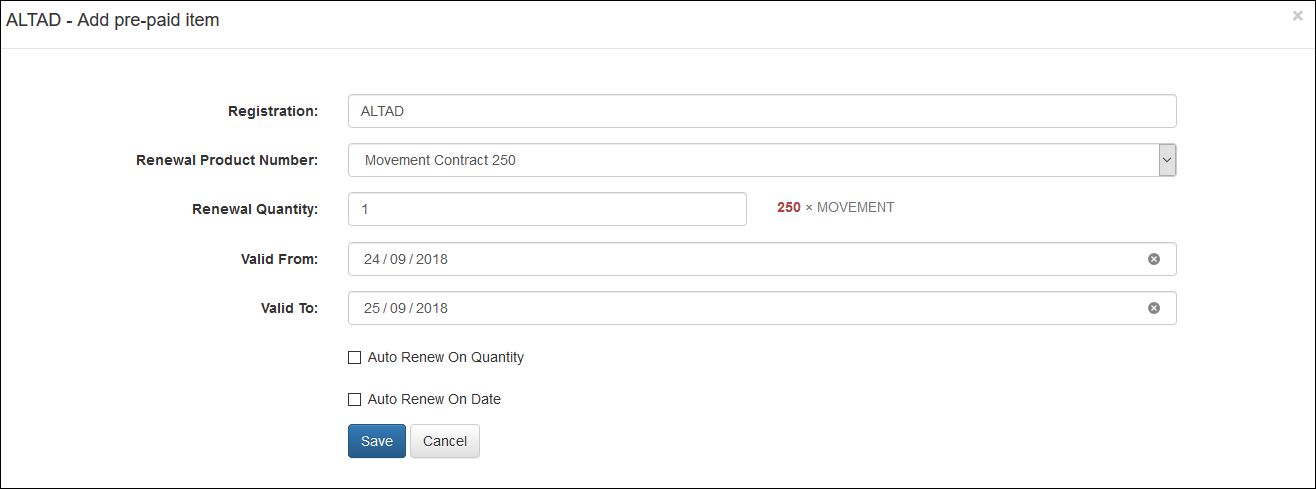
- Select + Add to open up a new prepaid item to that aircraft account.

- Registration will be automatically completed.
- Renewal Product Number is selected from a dropdown of recurring items that are available.
- Renewal Quantity enter the number required.
- Valid From enter the date this is valid from.
- Valid To enter the date this is valid to.
- Auto Renew select this box if the item is to be renewed once the specified quantity has been used.
- Auto Renew select this box if the item is to be renewed on a specified date.
- Select Save to complete the prepaid charge.
- Click the V to expand the detail on the prepaid item. Use the Move to customer option to transfer this charge from the aircraft to the customer linked to the Account in the Customer Details tab.
Aircraft Admin Infromation
- Select the Accounts tab. Select Admin then Aircraft Admin from the menu.
- The aircraft screen lists all current aircraft.
- The Show dropdown will change how many aircraft are displayed per page.
- Selecting Registration on the title row will sort the aircraft list.
- Select Registration twice will reverse the sort order.
- Search using the registration, this is a dynamic search that will filter the list as you type.
- The Aircraft Details screen can be opened by double clicking the aircraft's registration or selecting the Open button.
- Select Edit to open the full details of the aircraft and make changes (see creating an aircraft section for further guidance).
- Select Delete to remove the aircraft, this can only be done if there are no charges against the specific aircraft.