Products
- Select the Admin Tab select Products / Products.
- This screen lists all the Products and needs to be set up after Products Types and prior to Price Lines.
- The Show dropdown will change how many products are displayed on a page.
- Selecting either the Number or Name on the title row will sort the list.
- Selecting Number or Name twice will reverse the sort order.
- Search using the Number or Name, this is a dynamic search that will filter the list as you type.
- The individual Products screen can be opened by double clicking the Number, Name or selecting the Open button.
- Select the Edit button to open the full details of the product and make changes.
- To add a new product select the +Add on the Admin/Products/Products.
- Enter the details of the new product.
- Enter the Number for the Product. This can be alphanumeric, but must be unique.
- Enter the Name of the Product, this will be used in items like invoicing.
- Enter the Description of the Product
- Select the Product Type from the dropdown menu. The different Product Types will allow the Product to be used in different ways.
- Select a Tax Code from the drop down menu.
- If applicable select a Wing type code from the drop down menu.
- Enter the Caa Stats Count if known/applicable.
- Enter a Nominal Account Number if needed for integration into an external Accounting System.
- When you create a product you can add a child movement charge group if you want to.
- Tick the Is Active box if the Product is available.
- If the Product is part of a Group that is packaged for prepaid transactions, select which Group from the dropdown menu.
Creating Fuel Products
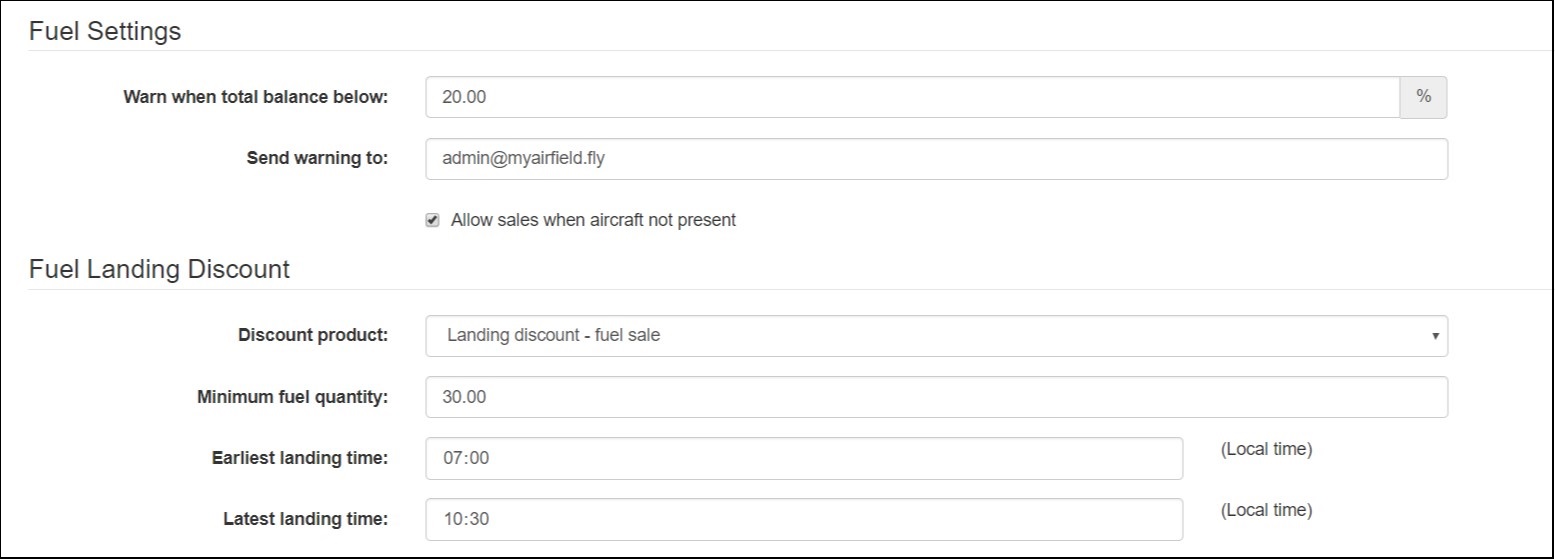
- When creating a fuel product type an additional two sections will appear on the Add Product screen.

- The Fuel Settings section allows you to configure a low fuel warning and to add fuel charges to away aircraft.
- Warn when total balance below allows you to enter a percentage that if the total balance of the full capacity in all stores of that fuel type falls below it, an email with be sent.
- Send warning to is where you enter the email address you want to receive the warning to.
- The email will contain not only the warning but also a suggested order quantity which will be based of previous months usage.
- Click the Allow sales when aircraft not present if you want to be able to charge fuel to an aircraft when it is away.
- The Fuel Landing Discount section is where you configure if and how landing discounts work in your airfield.
- In Discount Product select the already configured discount from the drop-down list.
- In Minimum fuel quantity set the minimum amount of fuel required to receive the discount.
- If you have a time period in a day, i.e. an early bird special, you can select in Earliest landing time the start time of when the discount is available.
- In the Latest landing time set the time that the discount runs until.
- If the discount is always available leave both the time fields blank.
Creating Group and Pre-Purchase Products
- To create a Pre-Purchase Product that has multiple products, e.g. a movements package that includes Take-offs and Landings, you must first create a Group Product.
- Create the Group Product as per the Adding Products section of this guide.
- In the Product Type ensure that Group is the selected type.
- Once saved the new Group Product option will be available in the Group section of the Add/Edit Product screen.
- Add or Edit the Products that would make up part of the Group, ensuring you select the correct Group Product in the Group section of the Add/Edit Product screen.
- Once you have all the Products in the Group you can create the Pre-Purchase Product.
- Begin creating the Product as the Adding Products Guide, but ensure the Product Type you select is the Pre-Purchase one.
- When this is selected a new section becomes available, Pre-Purchase Details.
- From the Pack Product Number dropdown menu select the Group Product that was created.
- In the Pack Product Quantity enter the number of uses the Pre-Purchase Product has.
- Select Save and the Pre-Purchase Product will be available in the Aircraft Admin screen under the Prepaid tab.